Introduction
WorkManager is an API that makes it easy to schedule deferrable, asynchronous tasks that are expected to run even if the app exits or the device restarts. The WorkManager API is a suitable and recommended replacement for all previous Android background scheduling APIs, including FirebaseJobDispatcher, GcmNetworkManager, and Job Scheduler. WorkManager incorporates the features of its predecessors in a modern, consistent API that works back to API level 14 while also being conscious of battery life.
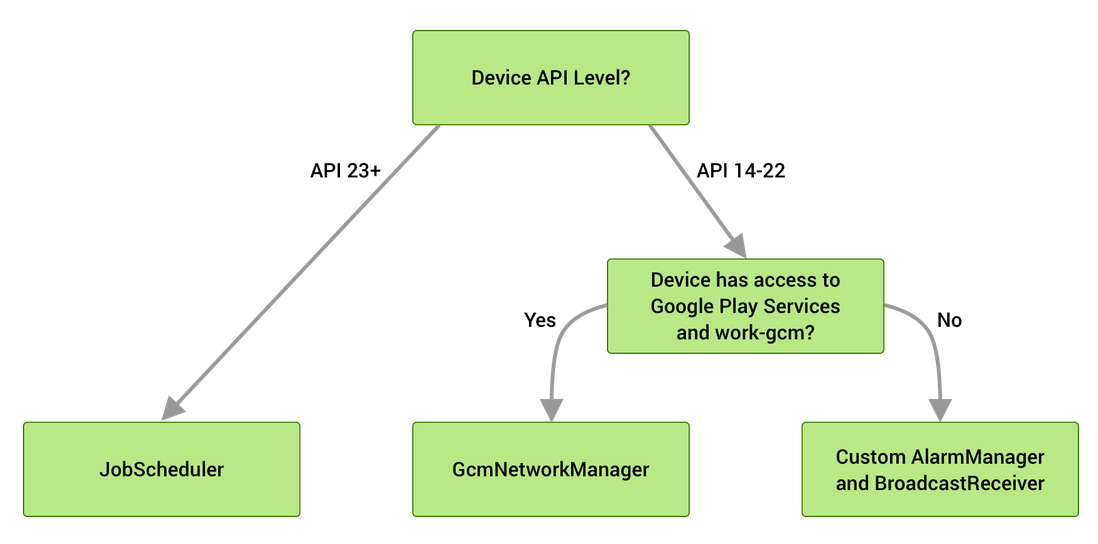
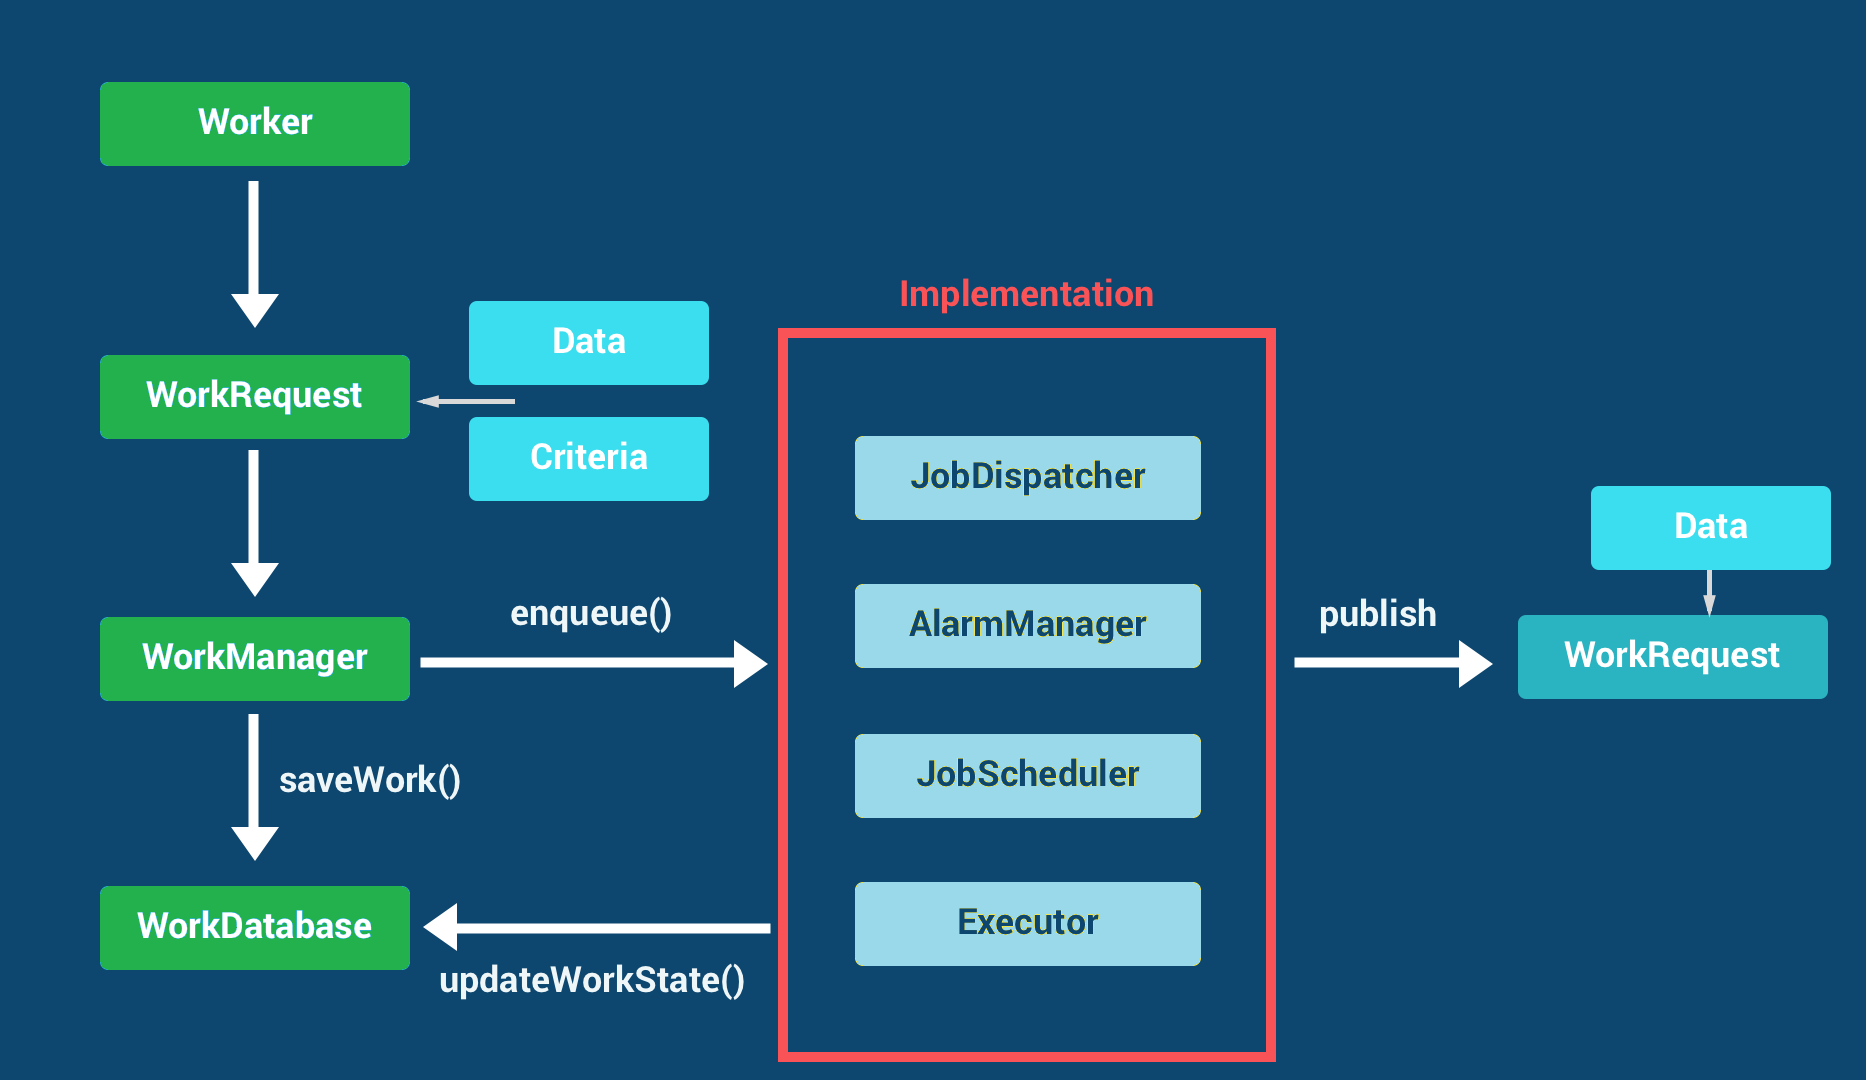
Under the hood WorkManager uses an underlying job dispatching service based on the following criteria:
In addition to providing a simpler and consistent API, WorkManager has a number of other key benefits, including:
Work Constraints
Declaratively define the optimal conditions for your work to run using Work Constraints. (For example, run only when the device is Wi-Fi, when the device idle, or when it has sufficient storage space, etc.)
- Schedule one-time and recurring work.
- Set work constraints like requiring Wi-Fi or charging.
- Guarantee a minimum delay in work execution.
- Set retry and back-off strategies.
- Pass input data to work.
- Group related work together using tags.
Robust Scheduling
WorkManager allows you to schedule work to run one- time or repeatedly using flexible scheduling windows. Work can be tagged and named as well, allowing you to schedule unique, replaceable work and monitor or cancel groups of work together. Scheduled work is stored in an internally managed SQLite database and WorkManager takes care of ensuring that this work persists and is rescheduled across device reboots. In addition, WorkManager adheres to power-saving features and best practices like Doze mode, so you don’t have to worry about it.
Flexible Retry Policy
Sometimes work fails. WorkManager offers flexible retry policies, including a configurable exponential backoff policy.
Work Chaining
For complex related work, chain individual work tasks together using a fluent, natural, interface that allows you to control which pieces run sequentially and which run in parallel.
WorkManager.getInstance(...)
.beginWith(Arrays.asList(workA, workB))
.then(workC)
.enqueue();
WorkManager.getInstance(...)
.beginWith(listOf(workA,workB))
.then(workC)
.enqueue()
For each work task, you can define input and output data for that work. When chaining work together, WorkManager automatically passes output data from one work task to the next.
Built-In Threading Interoperability
WorkManager integrates seamlessly with RxJava and Coroutines and provides the flexibility to plug in your own asynchronous APIs.
Use WorkManager for Deferrable and Reliable Work
WorkManager is intended for work that is deferrable—that is, not required to run immediately—and required to run reliably even if the app exits or the device restarts. For example:
WorkManager is not intended for in-process background work that can safely be terminated if the app process goes away or for work that requires immediate execution. Please review the background processing guide to see which solution meets your needs.
Define work requests
Getting started with WorkManager
To get started using WorkManager, first import the library into your Android project.
Add the following dependencies to your app's build.gradle file:
dependencies {
def work_version = "2.5.0"
implementation "androidx.work:work-runtime:$work_version"
implementation "androidx.work:work-runtime-ktx:$work_version"
implementation "androidx.work:work-rxjava2:$work_version"
implementation "androidx.work:work-gcm:$work_version"
androidTestImplementation "androidx.work:work-testing:$work_version"
implementation "androidx.work:work-multiprocess:$work_version"
}
Define the work
Work is defined using the Worker class. The doWork() method runs asynchronously on a background thread provided by WorkManager.
To create some work for WorkManager to run, extend the Worker class and override the doWork() method. For example, to create a Worker that uploads images, you can do the following:
public class UploadWorker extends Worker {
public UploadWorker(
@NonNull Context context,
@NonNull WorkerParameters params) {
super(context, params);
}
@Override
public Result doWork() {
uploadImages();
return Result.success();
}
}
class UploadWorker(appContext: Context, workerParams: WorkerParameters):
Worker(appContext, workerParams) {
override fun doWork(): Result {
uploadImages()
return Result.success()
}
}
The Result returned from doWork() informs the WorkManager service whether the work succeeded and, in the case of failure, whether or not the work should be retried.
- Result.success(): The work finished successfully.
- Result.failure(): The work failed.
- Result.retry(): The work failed and should be tried at another time according to its retry policy
Create a WorkRequest
Once your work is defined, it must be scheduled with the WorkManager service in order to run. WorkManager offers a lot of flexibility in how you schedule your work. You can schedule it to run periodically over an interval of time, or you can schedule it to run only one time.
However you choose to schedule the work, you will always use a WorkRequest. While a Worker defines the unit of work, a WorkRequest (and its subclasses) define how and when it should be run. In the simplest case, you can use a OneTimeWorkRequest, as shown in the following example.
WorkRequest uploadWorkRequest =
new OneTimeWorkRequest.Builder(UploadWorker.class)
.build();
val uploadWorkRequest: WorkRequest =
OneTimeWorkRequestBuilder<UploadWorker>()
.build()
Submit the WorkRequest to the system
Finally, you need to submit your WorkRequest to WorkManager using the enqueue() method.
WorkManager
.getInstance(myContext)
.enqueue(uploadWorkRequest);
WorkManager
.getInstance(myContext)
.enqueue(uploadWorkRequest)
The exact time that the worker is going to be executed depends on the constraints that are used in your WorkRequest and on system optimizations. WorkManager is designed to give the best behavior under these restrictions.
Work Manager Architecture
WorkManager - MAD Skills PlayList please refer for more details